Thursday, July 29, 2010

It just fits

If you don't want to see photos of my dress stop right HERE!!!!!!!

This week was my first fitting. I was terribly excited and wanted everything to be perfect. I've been working out really hard most mornings with good ole Jillian Michaels and I've gone down a dress size, hooray! My mom and future mother-in-law (FMIL) came with me to the appointment as moral support, but also because I feel bad for FMIL that she doesn't always get to do the "girly" stuff with two sons. I had shown her the photo of my dress last year when I first bought it, and she literally had zero reaction. Not a smile. Not a peep. Nothing. I was terrified she hated it, and she being only one step from her son (my husband to be!), I was somewhat worried he would hate it. Solution: Bring FMIL to the first dress fitting and let her see it in person and go from there. 

We arrived at the bridal salon and my consultant Lina brought my dress out and put it in the change room. I took a breath and went in. As I lifted it off the hanger to step into it I thought "Wow, I don't remember it being this heavy...". Seriously. That was what I thought. Not "Oh it's so beautiful!!!", no I was thinking about the weight and how much I might sweat because of it, how romantic. So I slipped into that sucker, zipped up as much as I could at the back, and walked out of the change room. 

FMIL (thankfully) was floored. She loves it. *whew* And of course, my mom was over the moon. She was also trying to tell the seamstress how to fix what where, but the seamstress was a very patient woman and just winked at me while I kept telling my mom to stop. It was nice my mom was so excited and I'm happy that she wants it to be perfect for me. I stepped into my lovely red shoes....


And pulled my bolero out of it's little plastic bag (with no wrinkles, how does that happen?!)....


And voila! Insta-bride!!!! I wish I had a few more photos to share, but FMIL was in charge of the camera and was so excited she kept forgetting to focus it, so I don't have very many usable photos!  I did manage to steal the camera for a second a take a photo of myself in the mirror to compensate for some of the blurry shots. I promise to give the camera to someone else at the next fitting ;)


There's very little to be done to the dress thankfully. The bust has to be taken in (damn you Jillian and all your freaking push ups!!!!), the lining around my hips needs to be let out a bit, and the bustle has to be put in. That's it! Hooray! Fitting #2 is in a couple of weeks and hopefully my veil will be in by then as well. 

On a side note, the ladies at the shop loved my bolero and red shoes. One lady very confidently looked at my shoes and said "Oh, those are Gucci". I refrained from laughing and said "No, they were $30 at Target and I got them three years ago, but thanks!". It's nice to see even the bargain finds are impressive!

Next week: Hair and make up trial! HOORAY!!!!

Sunday, July 25, 2010

Keeping it Old School

When I think old school, this song automatically pops into my head. So hit play and then continue reading please!

Now that we have a soundtrack, let's continue. I've been plagued my trying to figure out who's sitting where in our tent. For a long time, I was using the Martha Stewart Weddings online template which was great, but for a 30'x80' tent, I couldn't see the whole floorplan in one go, and if I zoomed out far enough, I couldn't see the names very well. 


See? Teeny tiny! Plus the Martha Stewart template wouldn't let me make a room narrower than 40', so I had to improvise a bit. No good. 

Next, I tried AutoCAD. I love CAD, I'm not going to lie. However, I didn't really feel like typing each person's name in blah blah blah. It's good for space planning but not so much for specific seating arrangements. However, using CAD really helped me to nail down my layout which was killing me. How could I make all these people fit and keep the fire pit*?! 


Now because I'm a design geek, I took this to the next level. I dragged an old big ass corkboard up from the basement, and measured out our tent in a 1/2"=1'-0" scale and marked it off in twine. I then printed out our tables, the fire pit, and dance floor to scale. Next I printed off our guest list and cut their names into strips. And then the fun began. I started pinning our tables and our guests onto the board. I could see everyone at the same time, which helped me to figure out which personalities fit together best, etc. All in all, once I started pinning it took me less than an hour to sort it out. 


Voila! Old school seating plan which is now the centrepiece of our living room. I should mention, I accounted for all of our yes's and our guests who have not replied yet in this floor plan, so if we lose people it's easier to adjust than trying to add 4 tables! Clearly this is not going to the venue, it's just for my mental sanity. I'll have to have a nicer version on site so we can put the place cards in the correct spots though.


*The fire pit. I don't think I've mentioned this. Some time between when we booked our venue and the winter, our venue decided to build a giant fire pit in the middle of the event space. Why they would do this I have no idea. At first I was very upset, I mean the thing takes up basically 400 square feet, that's 4 tables of space people!!! That's not a tiny little isn't it cute thing. Our venue was very nice and offered to move it for the wedding, but I thought okay, let's try to turn lemons into lemonade and see if we can accommodate said fire pit rather than causing a huge scene. Thankfully using CAD I was able to make it all fit, and we're sticking a corkscrew hazel tree into the fire pit with some lighting, etc and using it as a back drop to our sweetheart table. I think it's going to be lovely!
 

Monday, July 12, 2010

Cherry Pretzel Pie

I have a signature pie. It is likely the most requested thing I make, and funnily enough, the easiest! The recipe is my mom's, I have no idea where she got it from. This pie is so good, it can stop police in their tracks. You read that right, and  yes, the story will follow. Without further ado, Cherry Pretzel Pie.  

Warning: Although this sounds utterly weird and possibly disgusting, it is the best pie you will ever eat in your life. It is addicting. Don't say I didn't warn you.

3 cups smashed pretzels (that's about half a bag, I throw them in the food processor)
3/4 cups icing sugar
1 cup melted butter
- Mix all these together and set aside.

1 cup icing sugar
1 package of cream cheese (I use light cream cheese), softened
500 mL Cool Whip (that's half a container, I use the non-fat kind)
- Cream together the icing sugar and the cream cheese. Fold in the Cool Whip.

Press half the pretzel mixture in the bottom of a pie plate or 9x9 pan. Next layer on half the Cool Whip/cream cheese mixture, then a can of cherry pie filling. Now put on the remaining Cool Whip/cream cheese mixture, and top with the rest of the pretzel mixture. Wrap in plastic wrap and freeze!

This also works out well put into individual ramekins, but don't ever think you'll have better portion control if you do this, you'll just eat them all one after the other. 

And now, the story. We live on a river, it's lovely here. When we bought the house, we met our neighbours a few doors up who introduced us to their dock, which they attach a motor to and drive up and down the river. Dan was inspired. That summer, he and a few of his friends built us a 10'x12' dock/river raft. 

We weren't entirely sure of the legalities involved of said dock, but our neighbours have had one for years, so we figured we'd be fine. One beautiful summer evening, we took the dock down the river to watch the Sam Roberts concert at our local park. We had our emergency kit, life jackets for everyone, no alcohol, and of course, cherry pretzel pie. We got close to the concert and were stopped by another boater who said not to go closer, the marine police were there handing out tickets for various offenses. Not knowing exactly how legal our raft was, we stayed put and listened to the music that was drifting over. We could see the police on the other side of a very low bridge pointing flashlights at us, trying to check us out and see what we were up to (we also had tiki torches lit around the perimeter of the raft, we're a bit of a spectacle), but their boat wouldn't fit under the bridge. After about half an hour, they gave up and left, we felt relieved and decided not to tempt fate and head home. About half way back, we drifted to a stop near a reed island and were sitting and chatting. Out of nowhere, this low riding black boat with 4 marine police officers pulls up beside us (they were totally silent! It was creepy!), and an officer dressed in what looked like SWAT gear boards our raft. They were so determined to get our raft that they went back to their station and changed boats!

Minor heart attack anyone?! The officer asks "Who's responsible for this vessel?" and no one says anything. Thanks guys. So finally I peep up "I am" figuring I had dated a police officer for three years previously and if anyone was going to get out of trouble due to this, it would be me. We show him our life jackets, our emergency kit, and he checks around to make sure there's no alcohol on-board. He was very sorely disappointed and proclaimed us "The lamest party boat EVER"!!!! At this point, I start offering pie. At first, they all politely decline. However, like I said, I dated an officer for many years, I know how to charm police. I have skills. I manage to get the oldest officer to accept some pie, and as soon as he does, all the others agree to have some.
Soon enough they're  telling us how sure they were about how many tickets they were going to be able to give us, etc. We hung out with them for about half an hour chatting and laughing. The oldest marine officer asked if I was married and if not, would I marry him? I have to say, I was tempted, he had a seriously sexy Richard Gere in uniform type thing going on.... After the pie, we asked if we could go under the bridge to watch the concert and the officers all agreed that technically, there was no reason why not.

We have dubbed the raft the S.S. Barely Legal. 

Happy girls!

Okay not such a great photo, but this is the concert!

Tiki torch and a low bridge, we're nearly there!


Saturday, July 10, 2010

Taking Care of My Peeps


When it came time to do my bathroom baskets, I'll hit up my local Dollarama. It's possibly one of my favourite places on earth. I stocked up on various toiletries for the guys and girls. I got two boxes (one a bit smaller for the guys, they don't need as much "stuff" as us girls) since I sort of hate traditional woven baskets. That's right. I said it. I don't like woven baskets. 

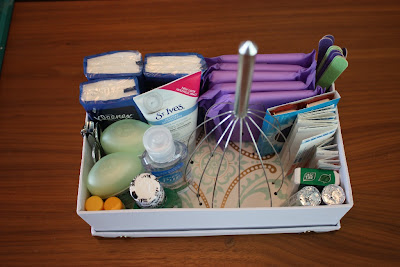
I got home and filled up my box. It looked.... boring.  


That big whisk lookin' thing is a scalp massager. Don't judge until you try. And when you try, your life will be changed ;)

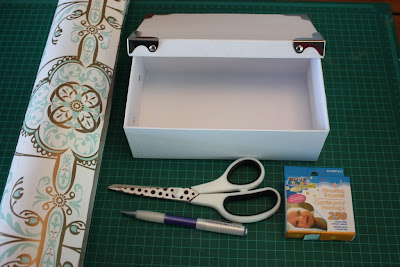
What to do............ I went down to the basement and grabbed a roll of funky wrapping paper, emptied out my box and went to town! 


First, I centered my box on the pattern on the paper (I likely should have done this on a light table, but I didn't feel like dragging my Yudu out, so I just did my best with it).  I traced the bottom of the box. I cut out the rectangle a bit smaller than the tracing and then did a dryfit, trimming as needed.


When it fit correctly, I put some double sided tape in each corner and stuck it down.  


Refill and voila! Much prettier!


I'm really happy with the results, I'm even happier I had the perfect wrapping paper on hand. For those of you who are curious, here's a quick list of what's in my baskets (with a few items I still need to add):

For the ladies
  • Mini deoderant
  • Lip balm
  • Mouthwash
  • Hand sanitizer
  • Kleenex
  • Moisturizer
  • Little pair of scissors
  • Mini-nail clippers
  • Tweezers
  • Pads
  • Emery boards
  • Gum
  • Tic Tacs
  • Breath Savers
  • Band-aids
  • Bobby pins
  • Hair elastics
  • And of course, the scalp massager
For the gents:
  • Lip balm
  • Mouthwash
  • Hand sanitizer
  • Kleenex
  • Moisturizer
  • Nail clippers
  • Gum
  • Tic Tacs
  • Breath Savers
  • Band-aids
  • Floss
  • Scalp massager
  • I'd like to find the guys a mini-deoderant and some cologne samples

Friday, July 09, 2010

Giving Back

Let's get touchy-feely here for a second. Seriously. I'm incredibly blessed in my life. I don't use that word easily or lightly since I'm a non-religious type, but it's the only word I've found that expresses how thankful I am for all the amazing opportunities I have and how overwhelmingly fortunate I feel each and every day. 

Last year, a good friend (and one of my bridesmaids) turned 30. She asked if for her 30th birthday we could all contribute $30 to a charity. How amazing is she?! Again, I am blessed both with beautiful family and friends. I chose to give money to Kiva, a microloan system. In a nutshell, it works like this: You give $____ to one of their entrepreneurs from around the world. You can choose by sex, sector, region, etc. After their fundraising goal has been met, said entrepreneur uses the money for _____ (raising pigs for sale at the local market, starting a general store, etc). As their business grows, they slowly pay back the money. When you start getting your loan back, you can reinvest in other entrepreneurs. It's fairly straightforward and it's awesome! 

My loan from last year was just repaid and I had the opportunity to reinvest. There are literally hundreds of people on the Kiva website and it can be hard to pick. I tend to pick people that are either close to their goal, or close to the expiry date and haven't reached their goal yet. First, I picked a flower grower in rural Phillippines. Everyone loves flowers and she sounds like a woman who works hard. She's separated from her husband and it sounds like she could use a lending hand. I can't imagine how hard it is for her, I'm honoured to help.

Next, I found a lady who wanted to raise money for her daughter's upcoming wedding. How could I not?! As a bride who's biggest problem is whether or not the table linens are the right size, the least I can do is help a mother in the Philippines to give her daughter a wedding. I don't have to decide between feeding my family or a wedding dress. So, if you're out there feeling like a spoiled rotten bride like me, consider helping Carmelita. She's $100 away from her goal. 

Sunday, July 04, 2010

Pillows of Delicious Addiction

I was given the heads up to an amazing new discovery. Pillow cookies. Thank you Bakerella for adding such an amazing new addiction to my life. I hope Jillian Michaels doesn't mind my cheating a bit on my workout plan/diet. They're so good I just can't help it!!!

What is this magical wonder I speak of you ask? So you make a tray of brownies. I'll admit I totally cheated and made a box of Duncan Hines fudge brownies. Let those bad boys cool. Now, follow Bakerella's recipe below. You make chocolate chip cookies, wrap up a brownie square inside and bake! It's a brownie inside a chocolate chip cookie! ARE YOU F-ING KIDDING ME?! Sorry. It's just that good. Trust me. Make them. Love them. Thank me and the lovely lady at the Bakerella website when you're done having your foodgasm. 

Original recipe found here. I didn't modify it all, although I imagine you could really use any kind of chocolate chip cookie recipe, but this one is awesome. 


Bakerella's Pillow Cookies

1 package brownie mix

1 cup butter, room temperature
1 1/2 cups packed light brown sugar
2 large eggs, plus 1 egg yolk
1 tablespoon vanilla
2 1/2 cups all purpose flour
2 teaspoons baking powder
1/2 teaspoon salt
1/2 teaspoon baking soda
12 oz. bag miniature semi-sweet chocolate chips

- Make brownies according to package and let cool. Cut about ten 1 inch squares. Enjoy the remaining brownies.
- For the chocolate chip cookie dough, beat butter with a mixer until creamy.
- Add brown sugar and beat until smooth.
- Add eggs, yolk and vanilla. Beat until smooth.
- Combine flour, baking powder, soda and salt in a medium bowl and stir together with a wire whisk.
- Add flour to butter mixture and beat until combined. Stir in mini chips.
- Let dough chill covered in the refrigerator for at least an hour.
- Preheat oven to 350 degrees.
- Use a measuring cup to scoop batter by the 1/2 cup. Since it’s chilled, you may need to pack it with a spoon. Then use the spoon to remove the dough from the cup and place it on parchment paper. Work quickly so the dough remains chilled or either prepare one cookie at a time so the rest of the dough remains cold.
- After the dough is on the parchment paper, make an indention and place a 1 inch square brownie in the center. Press the brownie down gently and work the remaining dough around the brownie. You can use your hands to shape the dough into a ball.
- Prepare six cookies at a time using a large baking sheet (15 X 20) and bake at 350 degrees for about 18 minutes. Return the remaining dough to the refrigerator until time to bake the second batch.
- Cool on the baking sheet for a few minutes and then cool completely on a wire rack.
- Makes about ten cookies using a little less than a 1/2 cup of dough for each cookie.
- If your cookies start to get too brown before they are done baking, you can place a sheet of aluminum foil over top for the last few minutes.

** My notes: 
  • Putting the dough to chill is a very important step, allow for the time when you make these. 
  • I got about 14 cookies out of this recipe. 
  • Parchment paper is a must for this recipe, don't skip that and do it straight on your sheet! They're a heavy cookie, so if you try to scrape them up off your cookie sheet you're in for disaster. 
  • I didn't have any problems with browning, but my oven runs a bit cool. 18 minutes was perfect.  
  • Warning: These are ridiculously addicting. We polished them off pretty quickly. I then moved up to Level 3 of the 30 Day Shred to repent for my baking addiction. 

The Big Reveal

I gave you the teaser a few weeks ago of our invitations, and they've all been delivered, so there's no reason to hold these bad boys back any more! Without further ado, the product of much love, sweat, and tears is revealed!

Page One

Page Two

Page Three

Page Four

Page Five

RSVP Postcard Front

RSVP Postcard Back

The whole package

A few tips I learned from other brides that have served me well. On the back of our postcards, I put a little heart, this serves two purposes. First, it matches the heart on the main page of our invite and looks cute. Second, it's my tracking system. Inevitably you'll get someone who RSVPs without a name (we've only gotten one so far). I bought a kids "spy kit" from Chapters online for something like $4 that came with an invisible ink pen and a black light. On my guest list Excel spreadsheet I gave each guest/couple/family a number. I wrote their corresponding number on the heart in the invisible ink on their postcard. Now if I get a blank named RSVP, I can use my blacklight to see that it's card number 38, look that up on my guest list and see that it was Mr & Mrs Smith who forgot to write their names. Magic! 

Don't forget to budget for stamps! When you make a mock up of your invitation make sure you take it to the post office and have it weighed to figure out the postage. There are weight and size restrictions for different classes of mail depending on your country. Don't guess what category you fit in, go to the post office and figure it out! Because I was doing a multi-page invite, it cost us $1.00/invitation to mail within Canada. Had we gone with a simpler design we could have fit in the $0.57 category. However, I never do things the simple way. I'm really happy with how they turned out and I wouldn't change them at all!


So I hope you've enjoyed our invites! I'm so happy I took the time to design, print, and sew them all myself. I loved putting so much of "us" into them. We've gotten nothing but compliments and great feedback from our guests which, of course, puts a huge smile on my face!